How to Build a DIY Insulated Ice Transport Bag for Mobile Bartending: Step‑by‑Step Guide to Keep Ice Cold On‑the‑Go
Introduction
Mobile bartenders must keep ice frozen for hours while navigating traffic, outdoor events, and cramped back‑of‑house spaces. This guide explains how to construct a custom insulated ice transport bag that fits under a bar cart, resists leaks, and remains lightweight. Readers will learn which materials provide the best thermal performance, how to assemble the bag without specialized tools, and which ready‑made products can simplify the process. By the end of the article, one will possess a reliable solution that reduces waste, improves service speed, and protects beverage quality.
What You’ll Need
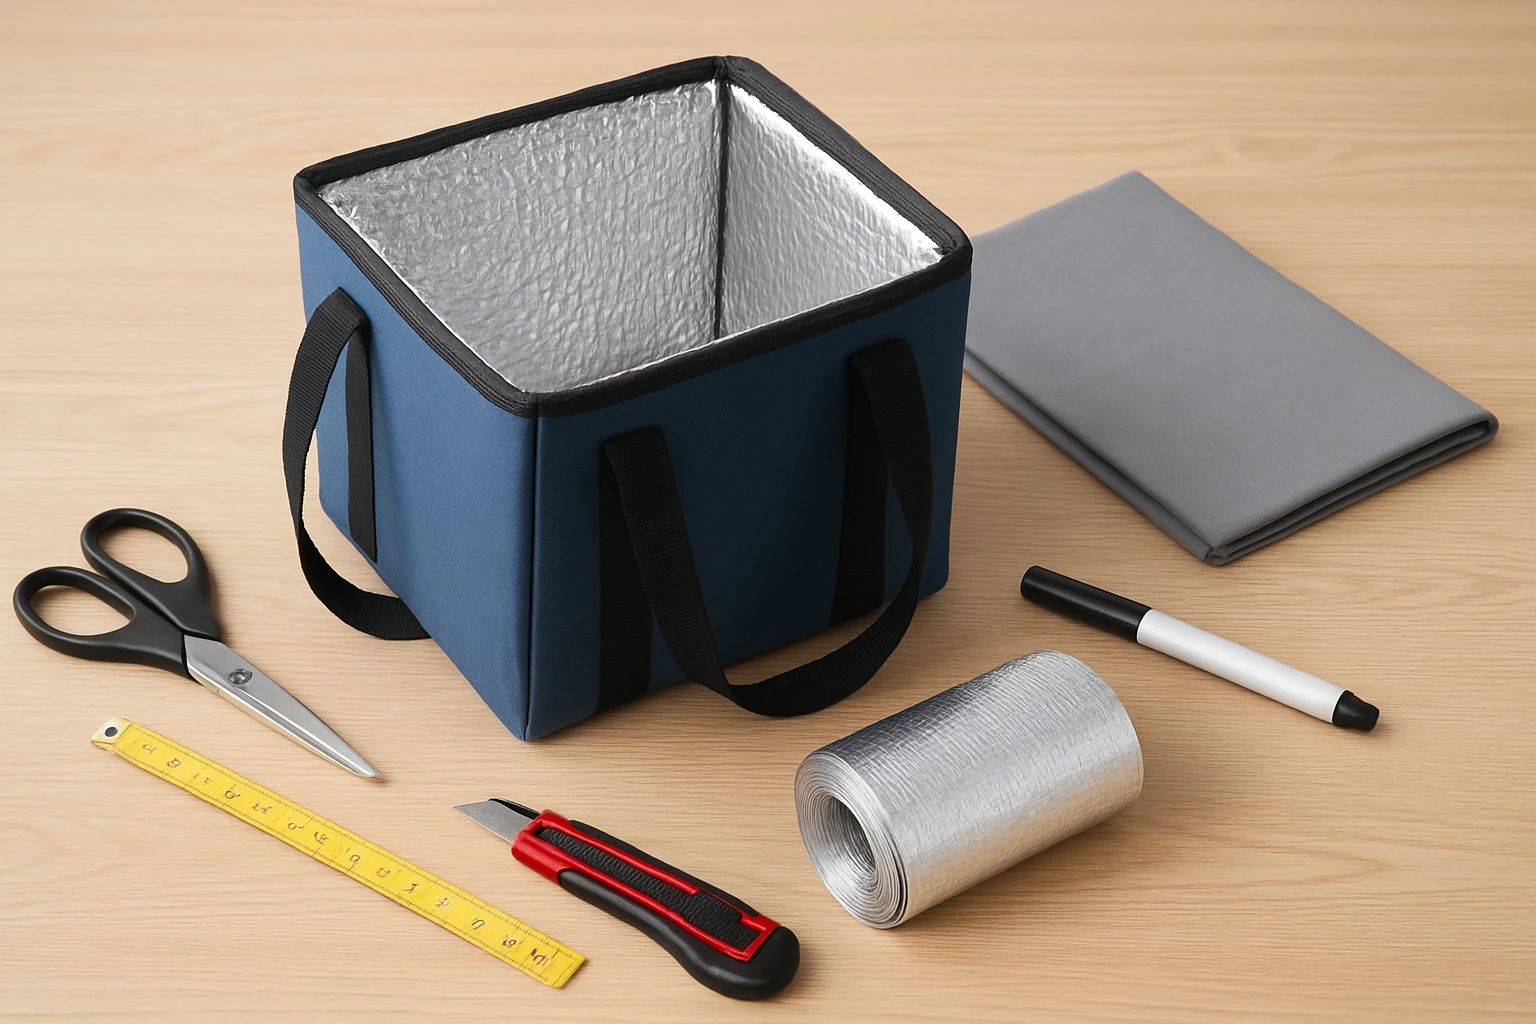
- Heavy‑duty 600D ripstop Oxford fabric (or a pre‑made insulated tote)
- High‑density EPE foam sheets (5 mm thickness recommended)
- Thermal aluminum foil liner (food‑safe, leak‑proof)
- Heavy‑duty zipper with anti‑burst feature
- Reinforced handles or shoulder straps
- Industrial adhesive or heat‑seal equipment
- Scissors, measuring tape, and a marker
- Optional tools: mosago Insulated Grocery Bag for reference dimensions and insulation performance
Step‑by‑Step Instructions
1. Determine the Desired Capacity and Dimensions
Begin by measuring the volume of ice required for a typical shift. Most mobile bars serve between 150 lb and 250 lb of ice, which translates to roughly 30 L to 50 L of space. The mosago Insulated Grocery Bag offers a spacious 39 L capacity (21" × 17" × 8") and can hold five 12‑inch pizza boxes, making it an excellent benchmark for a portable ice tote. Record the dimensions that best match your vehicle’s storage compartment, then add a margin of 2‑3 inches for seams and folding.
2. Cut the Exterior Fabric and Foam Core
Lay the ripstop Oxford fabric on a flat surface and mark the panel pieces according to the dimensions calculated in step 1. Cut two identical outer panels, one for the front and one for the back, plus side panels that will be folded to form the bag’s depth. Next, cut the EPE foam sheets to the same size; this foam provides the primary thermal barrier and adds structural rigidity. The musbus Large Pizza Carrier Bag utilizes a similar 5 mm foam core, demonstrating that a thin yet dense foam layer can sustain temperatures for over two hours.
3. Apply the Aluminum Foil Liner
Unroll the food‑safe aluminum foil liner and position it inside the foam core. The foil reflects heat, reducing temperature exchange between the ice and the external environment. Secure the liner to the foam using a thin line of heat‑resistant adhesive, ensuring no gaps that could cause condensation. The Bodaon XXXL Food Delivery Bag incorporates a premium foil layer that maintains hot or cold conditions for more than four hours, illustrating the effectiveness of this material in professional delivery contexts.
4. Assemble the Bag Structure
Place the foil‑lined foam between the two outer fabric panels, aligning edges precisely. Stitch the side seams using heavy‑duty thread; a double‑stitch pattern prevents seam failure under the 110 lb load rating of the mosago bag. Reinforce the corners with cross‑stitched handles to distribute weight evenly, reducing fatigue during transport. Attach a sturdy zipper—preferably an anti‑burst model—to the top opening, mirroring the reliable closure system found on the Bodaon XXXL bag.
5. Install Carrying Options
For mobile bartending, both hand‑carry and shoulder‑carry options are valuable. Sew reinforced loops at the top corners for hand‑carry, then add adjustable shoulder straps with padded pads to improve comfort on long shifts. The mosago bag’s dual‑carry ergonomic system serves as a model; its convertible straps reduce fatigue and allow the bag to be positioned vertically or horizontally within a van.
6. Test for Leakproof Performance
Fill the newly assembled bag with water and close the zipper. Turn the bag upside‑down and gently shake it for two minutes; any leakage indicates a seam or zipper defect. If leaks occur, reseal the affected seam with additional adhesive and re‑stitch if necessary. The leak‑proof aluminum foil interior of the mosago bag repels stains and oil, making it easy to clean with a damp cloth—an attribute you should replicate for hygiene compliance.
7. Optimize for Compact Storage
When the bag is empty, fold it along the pre‑scored lines to achieve a slim profile. The mosago bag folds down to a 2‑inch thickness, allowing storage in a glove compartment or under a bar counter. Incorporate a quick‑folding mechanism such as snap‑buttons or Velcro strips to facilitate rapid collapse after each event.
8. Personalize the Exterior (Optional)
Apply a vinyl decal of your bar’s logo or a reflective strip for night‑time visibility. This step does not affect insulation but enhances brand recognition and safety. Use a heat‑transfer method compatible with the 600D ripstop fabric to ensure durability.
Tips & Pro Tips
- Choose foam with a density of at least 30 kg/m³; higher density improves cold retention without adding excessive weight.
- When sewing, use a walking foot to prevent fabric puckering on the thick foam layers.
- Consider adding a small vent with a one‑way valve to release excess condensation without compromising temperature.
- Test the bag with a block of ice for at least four hours to verify thermal performance before the first event.
Troubleshooting
Problem: Ice melts faster than expected.
Solution: Verify that the foil liner is fully sealed and that the zipper closes completely. Replace any worn zipper teeth with a new anti‑burst zipper similar to the one on the Bodaon XXXL bag.
Problem: Bag feels too heavy when fully loaded.
Solution: Reduce foam thickness by 1 mm while maintaining density, or switch to a lighter ripstop fabric with comparable abrasion resistance.
Conclusion
By following these eight steps, one can construct a durable, leak‑proof insulated ice transport bag tailored to the unique demands of mobile bartending. The guide demonstrates how to leverage high‑performance materials—such as the 3‑layer insulation system found in the mosago, musbus, and Bodaon products—to achieve professional‑grade cold retention. With proper testing and optional branding, the bag becomes both a functional tool and a promotional asset, ensuring that cocktails stay chilled and customers remain satisfied.
Products Mentioned in This Guide
Frequently Asked Questions
What type of fabric provides the best durability for a DIY insulated ice transport bag?
Heavy‑duty 600D ripstop Oxford fabric is ideal because it resists tearing and moisture while remaining lightweight.
How thick should the foam insulation be for optimal ice retention?
Use high‑density EPE foam sheets about 5 mm thick; this balances thermal performance with flexibility.
Can I use a regular aluminum foil liner, or does it need to be food‑safe?
Choose a food‑safe, leak‑proof thermal aluminum foil liner to prevent contamination and ensure a waterproof seal.
What zipper feature prevents the bag from bursting when it’s full of ice?
Install a heavy‑duty zipper with an anti‑burst (reinforced) pull tab to handle the pressure of expanding ice.
Do I need special tools to assemble the bag, or can I use basic household items?
Basic tools like scissors, a measuring tape, and industrial adhesive are sufficient; heat‑seal equipment is optional for a stronger seam.