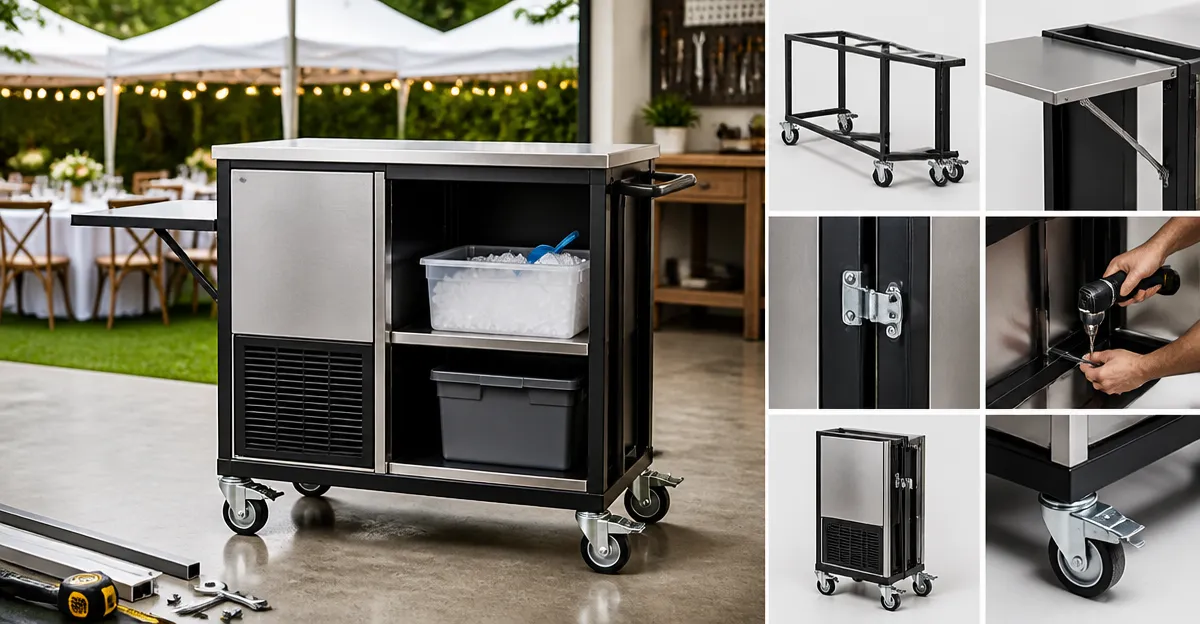
How to Build a Foldable Ice Maker Cart for Catering: DIY Step-by-Step Plans, Materials & Pro Tips
Introduction
In the catering industry, reliable access to ice can determine the success of a service. This guide explains how to construct a foldable ice maker cart that maximizes mobility, stability, and storage capacity. Readers will learn how to select a sturdy base, integrate an ice maker, and create fold‑away shelving that can be stored when not in use. By following the detailed steps, one can produce a professional‑grade cart without excessive expenditure.
The resulting cart will be suitable for banquet halls, outdoor festivals, and pop‑up kitchens. It will combine the convenience of a rolling platform with the durability required for daily heavy use. The guide also highlights commercial‑grade products that simplify the build while maintaining a high standard of performance.
What You'll Need
- Heavy‑duty steel frame or cart base (see product recommendations)
- Portable ice maker unit (nugget or bullet style)
- Foldable plywood or melamine shelves
- Lockable caster wheels
- Adjustable leveling feet
- Metal brackets, screws, and basic hand tools
- Optional: insulated cooler compartment for overflow ice
All of the recommended products are available on Amazon and include detailed specifications that match the requirements of this project.
Step 1: Choose a Stable Base Cart
The foundation of the ice maker cart must support the weight of the ice maker, water reservoir, and additional supplies. A well‑engineered base reduces wobble and protects the compressor of the ice maker.
One of the most suitable options is the NUNET Mini Fridge Stand Cart. This cart offers a 150 lb load capacity, reinforced carbon steel construction, and a 2‑tier layout that separates the ice maker from a 5‑gallon water jug. Priced at $69.99 with a 4.5‑star rating from two reviews, it provides lockable wheels for mobility and anti‑slip feet for permanent placement. The pull‑out water jug drawer simplifies refilling without lifting heavy bottles, which is essential for catering environments where time efficiency matters.
If a slightly higher load capacity is required, the HOOBRO Mini Fridge Stand can support up to 200 lb and includes a movable storage basket. At $59.99 and a 4.6‑star rating from 67 reviews, it offers both wheels with brakes and adjustable feet, allowing the cart to remain stationary during service. Its wooden top provides a stable surface for the ice maker while the lower drawer supplies extra storage for cups, napkins, and cleaning supplies.
Select the base that best aligns with the anticipated load and the desired aesthetic for the catering venue. Both carts are assembled with basic tools and include detailed manuals, ensuring a quick start to the project.
Step 2: Install the Ice Maker Unit
Secure the ice maker to the top surface of the chosen cart using metal brackets and non‑slip pads. Position the unit so that the water inlet is accessible from the lower tier or an adjacent sink.
When using the NUNET cart, the top shelf measures 19.69" by 19.69", providing ample room for a compact nugget ice maker. The reinforced steel frame prevents vibration from traveling to the floor, extending the lifespan of the appliance. Connect the water line to the pull‑out jug drawer for effortless refilling; the drawer’s gliding mechanism eliminates the need to lift the full 40 lb bottle.
For the HOOBRO stand, the wooden top can be reinforced with a thin sheet of plywood to create a level surface for a larger ice maker. The movable storage basket can be positioned behind the ice maker to hold spare ice trays and cleaning cloths, keeping the work area uncluttered.
Ensure the ice maker is level by adjusting the cart's leveling feet. A level machine operates more efficiently and produces uniform ice, which is critical for beverage presentation at events.
Step 3: Build Foldable Shelving
Foldable shelves increase the cart's versatility by providing temporary workspace for plating, garnish preparation, or storing perishable items. Use ¾‑inch plywood cut to the dimensions of the cart's top surface, then attach hinges that allow the shelves to fold flat against the sides.
Attach the hinges to the cart's side rails using stainless‑steel screws to resist corrosion in humid kitchen environments. When folded, the shelves occupy minimal space, enabling the cart to be stored in a back‑of‑house closet when not needed.
Optional reinforcement can be achieved by adding metal brackets at each corner of the shelf. This prevents sagging when heavy trays are placed on the surface during service.
Label each shelf with a waterproof marker to indicate its intended use, such as "Utensils" or "Prep Area." This practice streamlines workflow and reduces the risk of cross‑contamination.
Step 4: Integrate a Portable Cooler Compartment
While the ice maker continuously produces ice, a dedicated cooler compartment stores pre‑chilled beverages and perishable garnishes. A rolling cooler cart can be mounted beneath the main platform or positioned adjacent to the cart for easy access.
The VINGLI Rolling Ice Chest offers an 80‑quart capacity, dual directional wheels, and a built‑in bottle opener. Priced at $139.99 with a 4.5‑star rating from 2,293 reviews, it maintains temperatures for up to 48 hours and includes a bottom tray for additional storage. Its stainless‑steel construction matches the professional appearance of a catering cart.
For larger events, the Best Choice 80‑Quart Rolling Cooler provides a spacious interior that can hold up to 70 cans. At $189.99 and a 4.5‑star rating from 1,063 reviews, it features lockable wheels, a drainage cap, and a built‑in bottle opener with a catch tray. The sturdy steel frame ensures stability even when the cart is moved across uneven surfaces.
If a premium aesthetic and extended capacity are desired, the Permasteel Rolling Patio Cooler delivers a 120‑quart capacity, farmhouse design, and up to 36‑hour cooling performance. Priced at $255.02 with a 4.6‑star rating from 219 reviews, it includes removable dividers that transform the interior into a beverage and food cart. The four swivel caster wheels with lockable options provide smooth mobility while maintaining stability during service.
Select the cooler that aligns with the expected volume of guests and the desired visual theme of the catering operation.
Step 5: Add Finishing Touches and Safety Features
Secure all moving components with lockable casters to prevent unintended rolling during busy service periods. Install a short strap or cable tie system to keep the water jug drawer closed while the cart is in motion.
Apply non‑slip rubber pads to the top surface of the cart to keep plates and glasses from sliding. This simple addition improves safety for staff handling hot or cold items.
Label the power cord of the ice maker with a waterproof tag indicating voltage and shut‑off procedures. This practice complies with occupational safety standards and reduces the risk of electrical hazards.
Finally, perform a load test by placing the fully stocked ice maker, cooler, and additional supplies on the cart. Verify that the wheels lock securely and that the cart remains level on the floor.
Tips & Pro Tips
- Use a torque wrench when tightening screws on the frame to avoid over‑tightening, which can strip the threads.
- Apply a thin layer of silicone sealant around the water inlet to prevent leaks during transport.
- Consider adding a small LED strip under the top shelf for illumination during low‑light events.
- Store the cart under a canopy or cover when not in use to protect the steel frame from rust.
- Regularly clean the cooler's drainage plug to avoid water buildup that can cause mold.
Troubleshooting
| Problem | Possible Cause | Solution |
|---|---|---|
| Ice maker does not produce ice | Water supply line kinked | Inspect the pull‑out jug drawer and straighten any kinks; ensure the water valve is fully open. |
| Cart wobbles when moving | Uneven floor or loose caster wheel | Adjust the leveling feet until the cart sits evenly; tighten the caster wheel bolts. |
| Cooler does not stay cold | Seal around lid is damaged | Replace the gasket or apply a food‑grade silicone sealant to restore airtight closure. |
Conclusion
By following the outlined steps, one can construct a foldable ice maker cart that meets the rigorous demands of professional catering. The guide emphasizes the importance of a sturdy base, proper ice maker installation, flexible shelving, and integrated cooling storage. Utilizing products such as the NUNET Mini Fridge Stand Cart, HOOBRO Mini Fridge Stand, VINGLI Rolling Ice Chest, Best Choice 80‑Quart Rolling Cooler, and Permasteel Rolling Patio Cooler ensures reliability and efficiency. The resulting cart will enhance service speed, maintain beverage quality, and provide a polished appearance for any event.
Readers are encouraged to adapt the design to specific venue constraints and to maintain regular maintenance for long‑term performance. A well‑built ice maker cart becomes an indispensable asset that supports the success of any catering operation.
Products Mentioned in This Guide
Frequently Asked Questions
What materials are best for a durable foldable ice maker cart?
Use a heavy‑duty steel frame for strength, and foldable plywood or melamine for shelves to balance durability and weight.
How can I keep the cart stable while the ice maker is running?
Install lockable caster wheels, add adjustable leveling feet, and reinforce the frame with cross‑bracing.
Is the cart easy to fold and store in a small space?
Yes; design the shelves to hinge inward and use quick‑release pins so the entire unit folds flat for compact storage.
What type of wheels are recommended for smooth mobility on various surfaces?
Choose lockable caster wheels with rubber treads; they roll easily on concrete, carpet, and outdoor terrain while staying secure when locked.
How should I connect the ice maker’s power and water safely?
Use a grounded GFCI outlet for electricity and a food‑grade flexible hose with a shut‑off valve for water, securing all connections with zip ties.