Introduction
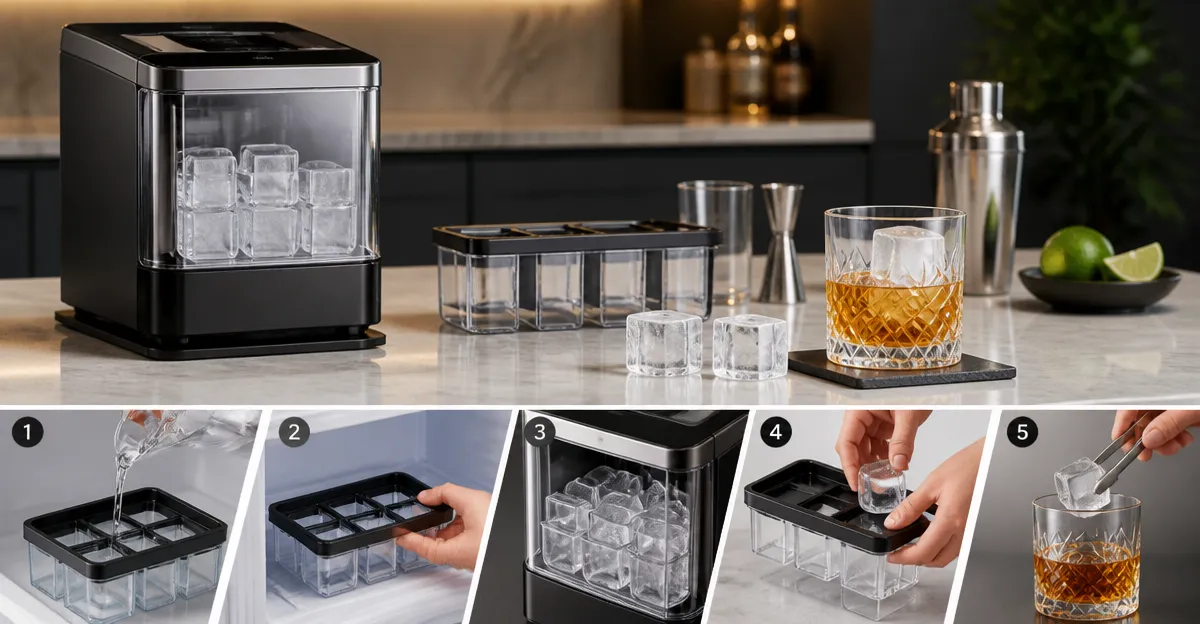
One will discover how to integrate a countertop ice maker with high‑quality clear ice molds to produce bar‑grade ice at home. The guide explains why clear ice improves flavor, slows dilution, and elevates presentation for cocktails, whiskey, and sparkling beverages. Readers will gain a systematic workflow that maximises efficiency while minimising waste. The result is a reliable supply of crystal‑clear ice for entertaining, daily sipping, or professional‑grade service.
What You'll Need
- One Frigidaire Countertop Ice Maker – 26 lb/day capacity, stainless steel, digital control.
- One clear‑ice mold of choice – for example, ClearlyFrozen Clear Ice Tray, True Cubes Clear Ice Mold, TINANA Clear Ice Tray, or GLAZER Mini Clear Ice Mold.
- Filtered or boiled water – mineral water produces the clearest result.
- Silicone spatula or metal salad tongs for cube extraction.
- Food‑grade zip‑lock bags or airtight containers for storage.
- Optional: small bowl for catching cubes, cleaning brush for silicone molds.
Step‑by‑Step Instructions
1. Prepare the Countertop Ice Maker
Place the Frigidaire Countertop Ice Maker on a stable surface near a water source. Fill the 2.1 qt water reservoir, then plug the unit into a grounded outlet. The machine produces nine bullet‑shaped cubes every seven minutes and can output up to 26 lb of ice per day, ensuring a constant supply for large gatherings.
Before the first cycle, run a cleaning rinse using a mixture of one part white vinegar to three parts water. This removes any manufacturing residues and prevents off‑flavors. After the rinse, discard the water and wipe the interior with a soft cloth.
Set the digital control panel to the desired cube size – the “large” setting yields cubes roughly 1 inch in diameter, which are ideal for pairing with clear‑ice molds that produce 2‑inch blocks. The transparent window allows monitoring of ice levels without opening the lid.
Allow the machine to complete its initial batch; the first ice will be used to pre‑chill the storage bin and confirm that the unit operates quietly and efficiently.
2. Choose and Prepare a Clear Ice Mold
For maximum clarity, the ClearlyFrozen Clear Ice Tray offers ten 2‑inch cubes per batch and includes a foam insulation box that directs air upward during freezing. Its BPA‑free silicone mold and directional‑freezing technology create glass‑like crystals without the need for distilled water.
If space is limited, the GLAZER Mini Clear Ice Mold produces a single 2.56‑inch square cube, perfect for intimate whiskey tastings. The mold’s stainless‑steel body and two custom plastic liners protect the silicone from freezer odors.
Alternative options include the True Cubes Clear Ice Mold, which yields four 2‑inch cubes, and the TINANA Clear Ice Tray, which creates eight large squares. All molds are BPA‑free and rely on the same top‑down freezing principle.
Before filling, inspect the silicone surface for debris and rinse with warm, soapy water. Allow the mold to air‑dry completely; residual moisture can create frost that interferes with clarity.
3. Fill the Mold with Water
Use filtered tap water or freshly boiled water that has been cooled to room temperature. Hot water reduces dissolved gases, which otherwise become trapped as bubbles during freezing. Pour the water slowly to avoid splashing, filling each cavity to within 3/16‑1/4 inch of the top line. Overfilling may cause spillover, while underfilling can produce uneven cubes.
For the ClearlyFrozen Clear Ice Tray, place the silicone tray inside the foam insulation box, then fill the outer plastic bin halfway before topping the silicone cavities. The insulated sides force air upward, resulting in crystal‑clear ice.
Seal the lid tightly to prevent freezer odors from entering the water. If the mold includes a removable liner, ensure it is seated correctly to avoid water leakage.
Record the start time; most molds require 18‑24 hours for complete solidification. The True Cubes Clear Ice Mold recommends 20 hours for average freezers, while the TINANA Clear Ice Tray suggests 30‑36 hours for optimal clarity.
4. Harvest the Clear Ice
When the freeze cycle is complete, remove the outer box or plastic bin and run lukewarm water over the bottom of the foam or silicone container. The temperature contrast loosens the ice without cracking the mold. For the ClearlyFrozen Clear Ice Tray, a brief stream of warm water around the rim is sufficient.
Gently twist the silicone tray to release the cubes. If resistance remains, use a silicone spatula or a pair of metal salad tongs, as reviewers have noted these tools work well without damaging the mold.
Transfer the cubes to a pre‑chilled zip‑lock bag. Press out excess air, seal, and store in the freezer for up to two weeks. The large crystal structure ensures a slow melt, preserving drink integrity.
For the GLAZER Mini Clear Ice Mold, which produces a single cube, allow the mold to sit at room temperature for one to two minutes before removal; the slight warming eases release.
5. Combine Machine‑Made Ice with Clear Cubes
While clear cubes provide premium presentation, the Frigidaire Countertop Ice Maker supplies a steady stream of bullet‑shaped ice for high‑volume service. Use the machine‑made ice as a base in large pitchers, then add a few clear cubes to garnish individual glasses.
This hybrid approach reduces the time spent waiting for large clear blocks while maintaining the visual impact of crystal ice. For example, a batch of sangria can be chilled with bullet ice, and each serving can be topped with a 2‑inch clear cube for a dramatic finish.
Because the bullet ice melts faster, it cools the beverage quickly, whereas the clear cube melts slowly, preventing premature dilution. This balance is especially valuable in professional‑grade home bars where efficiency and aesthetics are both priorities.
Maintain a clean water reservoir in the ice maker; replace the water weekly to avoid mineral buildup that could affect taste.
Tips & Pro Tips
- Use boiled water that has cooled to room temperature for the clearest ice; boiling drives out dissolved gases.
- Do not discard the foam insulation box that ships with the ClearlyFrozen Clear Ice Tray; it is essential for directional freezing.
- Run a thin layer of warm water over the exterior of any silicone mold before removal; this reduces the risk of cracking.
- Store extracted cubes in a single layer inside a zip‑lock bag to prevent them from sticking together.
- For large gatherings, prepare two molds simultaneously and rotate them in the freezer to ensure a continuous supply.
- Clean silicone molds promptly with a soft brush and warm dish soap; avoid dishwasher cycles that can degrade silicone over time.
Troubleshooting
| Problem | Possible Cause | Solution |
|---|---|---|
| Cloudy ice | Insufficient freezing time or water too cold | Extend freeze time by 2‑4 hours; use hot water before filling. |
| Ice sticks to mold | Silicone not fully thawed before removal | Run lukewarm water on the mold’s exterior for 10‑15 seconds. |
| Cube size varies | Overfilling or uneven water level | Fill each cavity to the recommended line; tap mold gently to release trapped air. |
| Ice maker stops producing | Water reservoir empty or filter clogged | Refill reservoir, clean filter, and reset the digital panel. |
Conclusion
By following the steps outlined above, one can reliably produce crystal‑clear ice using a countertop ice maker and premium clear‑ice molds. The combination of fast‑producing bullet ice and slow‑melting clear cubes offers both efficiency and visual appeal for any beverage service. Consistent results depend on proper water preparation, accurate filling, and attentive removal techniques. With practice, the home bartender will achieve professional‑grade presentation without the expense of commercial ice machines.
Readers are encouraged to experiment with different mold sizes, water temperatures, and storage methods to refine their own workflow. The tools highlighted in this guide provide a solid foundation for elevating any home bar or hospitality setting.
Products Mentioned in This Guide
Frequently Asked Questions
How does using a clear‑ice mold with a countertop ice maker improve cocktail quality?
Clear ice melts slower and has fewer trapped air bubbles, preserving flavor and keeping drinks colder longer.
What size of ice can the Frigidaire Countertop Ice Maker produce for clear‑ice trays?
It produces standard 1‑inch cubes that fit most clear‑ice molds, yielding bar‑grade ice in under an hour.
Do I need to pre‑freeze the clear‑ice mold before placing it in the ice maker?
Yes, chill the mold in the freezer for a few minutes to ensure the water freezes uniformly when the maker dispenses ice.
How often should I clean the ice maker when using clear‑ice trays?
Clean the unit every 2‑3 weeks with a mild vinegar solution to prevent mineral buildup and maintain crystal clarity.
Can I use any brand of clear‑ice mold with the Frigidaire ice maker?
Any BPA‑free silicone or plastic clear‑ice mold that fits the ice maker’s tray size will work, such as ClearlyFrozen, True Cubes, or TINANA.