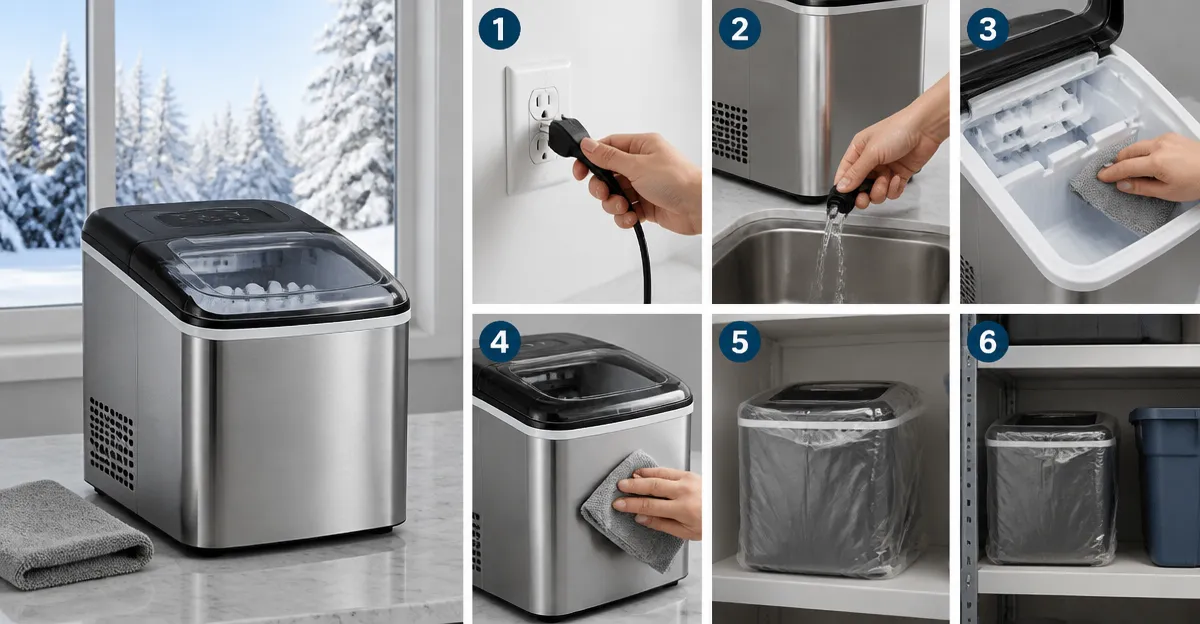
How to Winterize and Store Your Countertop Ice Maker: Step‑by‑Step Guide to Prevent Freeze Damage
Introduction
Winter temperatures can cause serious damage to countertop ice makers if they are not properly prepared for storage. This guide explains how to clean, protect, and store a portable ice machine so that it remains ready for use when the weather warms. One will learn practical actions, the rationale behind each step, and how a reliable ice maker such as the Silonn Portable Countertop Ice Maker can simplify the process. By following these instructions, one will avoid costly repairs and extend the lifespan of the appliance.
What You'll Need
- Soft, lint‑free cloths for wiping interior surfaces.
- White distilled vinegar for cleaning and descaling.
- Food‑grade silicone storage bag or airtight container.
- Silica gel packets or moisture absorbers to prevent condensation.
- Protective moving box or sturdy cardboard with padding.
- Access to a clean, dry workspace.
- The Silonn Portable Countertop Ice Maker itself, which will be the central tool in this procedure.
Step 1: Power Down and Unplug the Unit
The first action is to disconnect the ice maker from any electrical source. This eliminates the risk of electric shock and ensures that the internal compressor does not engage while cleaning. One should also press the power button for three seconds to confirm that the unit is fully off. By removing power, the appliance is safe to move and handle without accidental activation.
Step 2: Empty the Water Reservoir and Ice Basket
Remove the water tank and pour out any remaining water to avoid freezing inside the components. The basket that holds ice should be taken out, and any residual ice cubes should be discarded. This step prevents expansion of frozen water, which can crack the storage compartment. The detachable design of the Silonn Portable Countertop Ice Maker makes removal straightforward, reducing the effort required.
Step 3: Perform a Thorough Cleaning Cycle
Prepare a cleaning solution by mixing one part white distilled vinegar with three parts water. Fill the empty reservoir with the solution, close the lid, and activate the self‑cleaning function by holding the CLEAN button for five seconds. The machine will run a 30‑minute cycle that removes mineral deposits and eliminates bacterial growth. After the cycle completes, rinse the reservoir with fresh water and repeat the cleaning button once more to flush any remaining vinegar.
Step 4: Dry All Removable Parts Completely
Use a soft, lint‑free cloth to dry the water tank, basket, and exterior surfaces. Allow the components to air‑dry for at least thirty minutes in a well‑ventilated area. Moisture left on metal parts can lead to rust during prolonged storage. The compact size of the Silonn Portable Countertop Ice Maker enables easy placement on a countertop where it can dry without obstruction.
Step 5: Apply a Protective Seal to the Exterior
Lightly coat the outer housing with a thin layer of food‑grade silicone spray. This creates a barrier against dust, humidity, and accidental spills while the unit is stored. One should follow the manufacturer’s instructions for ventilation and drying time after application. The silicone coating does not interfere with the machine’s operation when it is later re‑installed.
Step 6: Pack the Ice Maker for Long‑Term Storage
Select a sturdy moving box that is slightly larger than the dimensions of the ice maker (8.7 x 11.4 x 11.6 inches). Place a layer of packing peanuts or crumpled paper at the bottom, then position the ice maker upright on its handle. Fill any remaining voids with additional padding to prevent movement during transport. Finally, seal the box with packaging tape and label it as “Fragile – Keep Dry.”
Step 7: Store in a Climate‑Controlled Environment
The ideal storage location is a dry, temperature‑controlled space such as a basement, garage, or utility closet that remains above freezing. Avoid attics or unheated sheds where temperatures can drop below 32°F (0°C). Place silica gel packets inside the box to absorb residual moisture. By maintaining a stable environment, one safeguards the ice maker from freeze‑induced cracks and corrosion.
Tips & Pro Tips
- Mark the box with the date of storage to track how long the unit has been idle.
- Periodically inspect the box for signs of moisture or pest activity.
- If the storage period exceeds six months, repeat the cleaning cycle before the next use.
- Consider using a small dehumidifier in the storage area for added protection.
- The built‑in handle of the Silonn Portable Countertop Ice Maker makes relocation effortless, reducing the risk of dropping the appliance.
Troubleshooting
Problem: Ice maker does not power on after winter storage.
Solution: Verify that the power cord is fully inserted, check the circuit breaker, and ensure that the water tank is seated correctly. If the unit still fails to start, run a self‑cleaning cycle to clear any residual mineral buildup.
Problem: Unusual odors when the machine is first used.
Solution: Perform an additional rinse cycle with fresh water and allow the interior to dry completely before producing ice. The odor typically originates from trapped cleaning solution.
Conclusion
By following the detailed steps outlined above, one can winterize and store a countertop ice maker with confidence. Proper cleaning, drying, protective sealing, and climate‑controlled storage prevent freeze damage and extend the appliance’s service life. When the next warm season arrives, the ice maker will be ready to produce fresh, bullet‑shaped cubes without extensive reconditioning. Implement these practices annually to maintain optimal performance and avoid costly repairs.
Products Mentioned in This Guide
Frequently Asked Questions
How often should I clean my countertop ice maker before storing it for winter?
Clean it thoroughly once before storage, removing all mineral buildup and residue.
What is the best method to prevent freeze damage in a portable ice maker?
Drain all water, wipe dry, and store the unit in a dry, insulated container away from freezing temperatures.
Can I use regular tap water for cleaning before storage, or is distilled vinegar required?
Use white distilled vinegar mixed with water to descale; tap water alone may leave mineral deposits.
How should I pack the ice maker for storage to avoid condensation?
Place the dry unit in an airtight silicone bag or container with silica gel packets and cushion it with padding.
When should I reconnect and test the ice maker after winter storage?
Reconnect only after indoor temperatures are consistently above 50°F (10°C) and run a short cycle to verify operation.