How to Remove Chlorine Taste from Ice Without Replacing the Filter: 8 Quick DIY Fixes
Introduction
Chlorine is commonly added to municipal water supplies to control bacterial growth, yet its residual taste can linger in ice cubes and affect the flavor of beverages. This guide teaches readers eight actionable methods to reduce or eliminate chlorine taste from ice without the need to replace existing filtration hardware. By following these steps, one can improve water quality, protect appliance longevity, and enjoy clearer, more refreshing drinks.
The techniques presented combine low‑cost household items, targeted cleaning agents, and optional premium filtration products. Each method is explained with clear rationale, allowing readers to select the approach that best matches their budget and convenience.
Readers will also find professional‑grade product recommendations that serve as tools for specific steps. These suggestions are optional; the guide remains valuable even if one chooses not to purchase any items.
Let us begin the journey toward chlorine‑free ice.
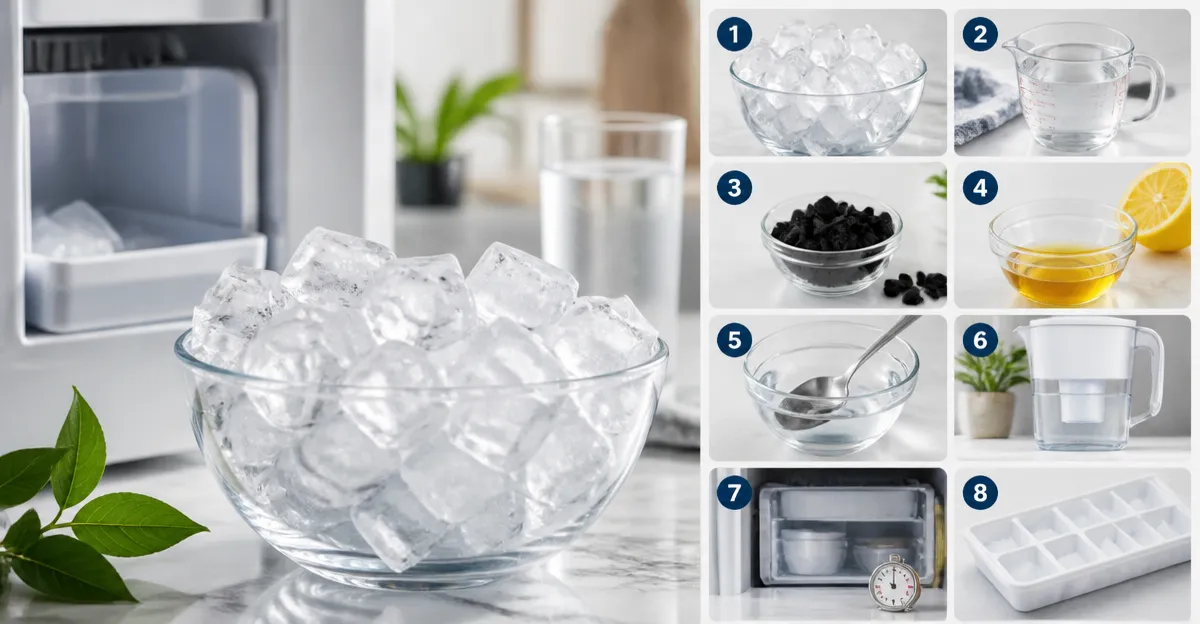
What You Will Need
- Clean containers for soaking or boiling water
- Measuring cup or small bowl
- Soft cloth or sponge
- Optional: HiWater Inline Filter (2‑Pack)
- Optional: Vigorder Ice Cleaner Tablets (36‑Pack)
- Optional: Hydronix Polishing Filter
- Optional: Frizzlife Inline Filter System
- Optional: ICEPURE Inline Water Filter
Step 1: Verify the Source Water Quality
The first step is to confirm whether chlorine is present in the tap water that feeds the ice maker. One can fill a clear glass with cold water and observe any faint yellowish hue or chlorine odor. If the taste is noticeable, the subsequent steps become necessary.
For households that already use an inline carbon filter, the HiWater Inline Filter provides a 0.5‑micron coconut‑shell activated carbon block that reduces chlorine, fluoride, limescale, and other contaminants. Priced at $24.99 for a two‑pack, it holds a 4.5‑star rating from 126 reviews. Installing this filter can improve the baseline water quality before applying any DIY techniques.
Installation requires no tools; the 1/4‑inch quick‑connect ends snap directly onto the water line feeding the refrigerator or ice maker. Each cartridge lasts approximately 3,000–3,500 L, equivalent to 12 months of typical use.
Even if one does not purchase the filter, confirming the presence of chlorine informs the choice of subsequent remedies.
Step 2: Pre‑Filter Water Using a Pitcher or Countertop Filter
Before filling the ice tray, run tap water through a pitcher‑style filter that employs activated carbon. This simple step removes a substantial portion of chlorine, especially when the water is allowed to sit for 10–15 minutes after filtration.
Alternatively, the ICEPURE Inline Water Filter can be installed on the refrigerator’s water line. It is NSF/ANSI 42 certified for chlorine reduction and features a 1/4‑inch compression fitting for quick installation. At $21.99 and a perfect 5‑star rating from two reviewers, this filter offers a compact solution for households that prefer a permanent inline device.
After filtration, collect the water in a clean container and use it to fill the ice maker’s reservoir. The reduced chlorine concentration will translate into clearer, better‑tasting ice.
Remember to replace the pitcher filter or inline cartridge according to the manufacturer’s schedule to maintain optimal performance.
Step 3: Boil Water Before Freezing
Boiling water drives off dissolved chlorine through volatilization. Bring the required amount of water to a rolling boil, then let it cool to room temperature before transferring it to the ice tray.
This method requires no additional products, yet it is highly effective for small batches of ice used for cocktails or special occasions. The cooling period also allows any residual chlorine to dissipate further.
For larger households, one may consider using a kettle with a built‑in filter to combine steps 2 and 3, thereby reducing the time spent on separate boiling and cooling phases.
While boiling does not remove other minerals, it does not reintroduce chlorine, making it a safe, low‑cost solution.
Step 4: Use Activated Charcoal Granules in a Mesh Bag
Activated charcoal granules can be placed in a fine mesh bag and submerged in the water reservoir for several hours. The granules adsorb chlorine molecules, improving taste without altering the water’s mineral balance.
One may purchase bulk charcoal separately, but the HiWater Inline Filter cartridge already contains a high‑quality coconut‑grade carbon block, making it an efficient alternative for those who already own the product.
After the adsorption period, discard the mesh bag and fill the ice maker with the treated water. This approach is particularly useful when the ice maker cannot be easily disconnected for filter replacement.
Ensure the mesh bag is tightly sealed to prevent granules from escaping into the water line.
Step 5: Clean the Ice Maker with Descaling Tablets
Mineral buildup inside the ice maker can trap chlorine, releasing it slowly into each new batch of ice. Regular cleaning with a descaling agent removes these deposits.
The Vigorder Ice Cleaner Tablets are nickel‑safe, food‑grade citric‑acid tablets designed for countertop and portable ice makers. Priced at $8.99 for a 36‑tablet pack, they hold a flawless 5‑star rating from fifteen reviewers.
To use, turn off the ice maker, empty any ice, and place one or two tablets into the water reservoir. Fill the reservoir to the indicated line, allow the tablets to dissolve completely, and run two cleaning cycles. Discard the water after each cycle. This process eliminates scale and reduces residual chlorine taste.
Do not consume ice produced during the cleaning cycles, as it may contain dissolved cleaning agents.
Step 6: Install a Post‑RO Polishing Filter
If the household already employs a reverse‑osmosis (RO) system, adding a polishing filter downstream can capture any remaining chlorine and improve taste.
The Hydronix Polishing Filter offers a 2,000‑gallon service life, effective chlorine reduction, and NSF‑certified coconut shell carbon. Although the price is not listed, its 4.6‑star rating from 727 reviews attests to reliability.
Installation involves connecting the filter’s 1/4‑inch NPT ports to the RO system’s output line. Once installed, the water supplied to the refrigerator and ice maker will have minimal chlorine content, resulting in consistently clean ice.
This solution is ideal for homes seeking long‑term water quality improvement without frequent cartridge changes.
Step 7: Upgrade to a Comprehensive Inline System
For users who desire a single, robust solution, the Frizzlife Inline Filter System provides a 0.5‑micron filter that reduces chlorine, lead, and particulates. It is certified to NSF/ANSI 42&53 standards and includes compression brass fittings compatible with copper tubing.
At $68.39, this system delivers up to two years of filtration per cartridge, significantly lowering replacement costs compared with standard filters. The auto‑shut‑off design eliminates the need to stop water flow during cartridge changes, and the twist‑in mechanism allows replacement in seconds.
Installation requires connecting the system to either the refrigerator’s angle valve or an under‑sink valve. No additional tools are necessary, and the package includes all required fittings.
By installing this system, one creates a permanent barrier against chlorine, ensuring that every ice cube produced is free from unpleasant taste.
Step 8: Establish a Regular Maintenance Schedule
Even the best filtration devices lose effectiveness over time. Schedule cartridge replacements according to manufacturer guidelines—typically every 12 months for the HiWater Inline Filter, every 24 months for the Frizzlife system, and annually for the Hydronix polishing filter.
In addition, perform a monthly cleaning of the ice maker using the Vigorder Ice Cleaner Tablets or a vinegar‑water solution. This habit prevents scale accumulation and maintains optimal chlorine removal.
Document the dates of filter changes and cleaning cycles in a kitchen log. Consistent record‑keeping simplifies future maintenance and ensures continuous water quality.
Adhering to a maintenance routine maximizes the lifespan of all equipment and preserves the freshness of ice.
Tips & Pro Tips
- Always allow filtered water to sit for a few minutes before freezing; this promotes even temperature distribution and reduces the chance of trapped gases.
- When using boiling water, add a pinch of baking soda to neutralize any residual acidity that may affect taste.
- For large‑scale commercial settings, consider installing multiple inline filters in series to achieve higher chlorine removal efficiency.
- If the ice maker has a built‑in filter, verify its compatibility with the recommended cartridges before purchase.
- Store replacement cartridges in a cool, dry place to prevent premature degradation of the carbon media.
Troubleshooting
Problem: Ice still tastes of chlorine after following steps.
Solution: Verify that the water line is not bypassing the filter. Check for leaks at the quick‑connect fittings and ensure the filter housing is fully seated. If the filter is older than its service life, replace it with a new cartridge.
Problem: Ice maker produces no ice after installing an inline filter.
Solution: Confirm that the filter’s flow restriction is not excessive. Flush the system for several minutes to clear any trapped air. If the problem persists, inspect the water pressure; low pressure may require a booster pump.
Conclusion
Removing chlorine taste from ice does not require a complete overhaul of existing filtration hardware. By applying the eight DIY fixes outlined above—ranging from simple boiling to the installation of advanced inline filters—one can achieve clear, flavorful ice while extending the life of appliances. The optional products recommended provide targeted solutions for each step, yet the guide remains fully functional without any purchase.
Implement the steps, maintain a regular schedule, and enjoy ice that enhances rather than detracts from beverages.
Products Mentioned in This Guide
Frequently Asked Questions
Why does ice sometimes taste like chlorine?
Chlorine added to municipal water can remain in the water after freezing, releasing a noticeable taste in ice cubes.
Can boiling water remove chlorine before making ice?
Yes, boiling drives off chlorine gas, so using boiled and cooled water for ice eliminates most of the taste.
What household item can neutralize chlorine in ice?
Adding a small amount of baking soda or vitamin C (ascorbic acid) to the water neutralizes chlorine without affecting flavor.
How often should I clean my ice maker to prevent chlorine buildup?
Clean the ice maker and water reservoir every 1–2 months with a mild bleach solution or vinegar rinse to remove chlorine residues.
Do I need a new filter to stop chlorine taste in ice?
No, using DIY methods like boiling, baking soda, or a quick cartridge filter can remove chlorine without replacing the entire filtration system.