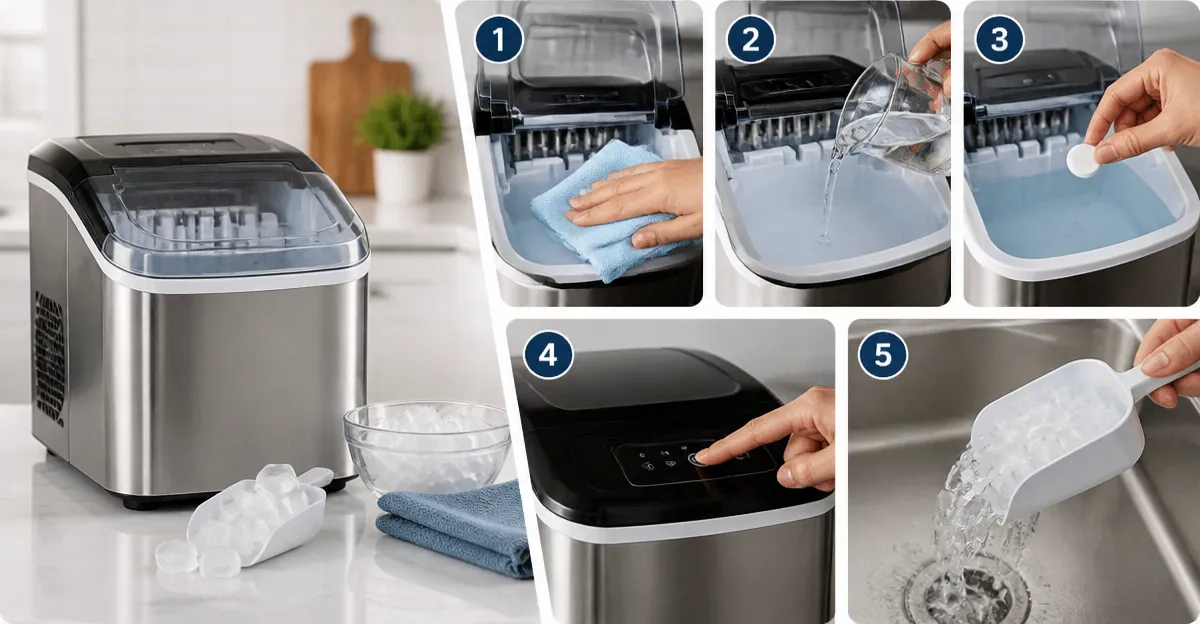
How to Season a New Countertop Ice Maker: 5 Easy Steps to Clean, Prime, and Prep for First Use
Introduction
When a brand‑new countertop ice maker arrives, it does not come ready to produce flawless ice immediately. Proper seasoning removes manufacturing residues, calibrates temperature sensors, and ensures the unit delivers consistent cubes or nuggets from day one. This guide explains five practical steps that any homeowner or small‑business operator can follow, and it highlights tools that simplify each stage while preserving the machine’s warranty.
Readers will learn how to perform a thorough pre‑use cleaning, prime the water system, verify the insulation, configure the control panel, and run a test cycle. By following these instructions, one can avoid common problems such as cloudy ice, foul odors, or premature wear.
What You’ll Need
- Soft‑brush cleaning sponge or non‑abrasive cloth
- Food‑grade white vinegar (5 % acidity) or a commercial ice‑maker cleaning solution
- Measuring cup for water
- Clean, lint‑free towels
- Access to a sink with hot water
- One of the recommended ice makers for reference (first mention linked below)
Step 1: Unbox, Inspect, and Position the Unit
Begin by removing the ice maker from its packaging, checking that all accessories—water inlet hose, drain hose, scoop, and user manual—are present. Place the appliance on a level surface; most countertop models include adjustable feet, as seen on the VEVOR Ice Maker. Level placement prevents uneven water flow, which can cause uneven ice thickness.
Ensure the unit is at least six inches away from walls to allow proper ventilation. The stainless‑steel exterior of the VEVOR model provides excellent heat resistance, while its integrated cyclopentane foam insulation retains cold for up to eight hours when power is lost. Positioning the machine near a cold water line simplifies future water‑fill operations.
After positioning, allow the unit to stand upright for 24 hours. This waiting period lets internal fluids settle, preventing air bubbles that could affect the first production cycle.
Step 2: Perform the Initial Self‑Cleaning Cycle
All three recommended machines feature a one‑touch self‑cleaning function that circulates water through the evaporator to dissolve mineral deposits. Activate the cleaning mode on the EUHOMY Nugget Ice Maker by pressing the “CLEAN” button for five seconds. The unit will run a 10‑minute rinse, flushing out any factory lubricants.
If the model lacks an automatic clean, fill the water reservoir with a mixture of one part white vinegar to three parts water, then run a manual cycle. The mild acidity dissolves scale without damaging the stainless‑steel components. After the cycle completes, discard the solution and run two fresh‑water cycles to rinse.
Why use the built‑in cleaning feature? The VEVOR model’s LED panel indicates “Full Ice” and “Low Water” alerts, while its self‑cleaning routine uses a timed pump that reaches every internal surface, offering a more thorough cleanse than a simple rinse.
Step 3: Prime the Water Supply and Adjust Ice Thickness
Connect the inlet hose to a cold‑water faucet, ensuring a tight seal to avoid leaks. Open the valve slowly to fill the internal reservoir. For the Typhur Smart Ice Maker, the app allows you to set a precise water‑fill level, which is useful for environments where water pressure fluctuates.
Once the tank is full, use the control panel to select the desired ice thickness. The VEVOR Ice Maker produces 0.87‑inch square cubes, and the thickness can be altered by adjusting the freezing time. Thicker cubes are ideal for cocktails that require slower melting, while thinner cubes suit rapid‑cooling applications such as smoothies.
Run a short “prime” cycle—approximately five minutes—without collecting ice. This step clears any air trapped in the lines and stabilizes the temperature sensor. Observe the LED display for any fault alerts; a steady green light indicates normal operation.
Step 4: Verify Insulation and Drainage
Even though the machines are insulated, a quick check ensures optimal performance. Gently place a hand on the exterior after the first cooling cycle; the surface should feel cool but not frosty. Excess frost indicates a seal breach, which can be corrected by tightening the flip‑top lid on the VEVOR model.
Attach the drain hose to a suitable sink or floor drain. The EUHOMY Nugget Ice Maker’s compact design includes a built‑in drain plug that prevents accidental water spillage during cleaning. Verify that water exits freely; a clogged drain can cause water buildup and lead to mold growth.
For the Typhur Smart Ice Maker, the pump‑driven self‑cleaning system also flushes the drainage pathway, reducing the need for manual intervention. This feature is especially valuable for RV owners who operate the unit in confined spaces.
Step 5: Run a Full Production Cycle and Evaluate Ice Quality
Press the “ICE” button on the selected model to begin a full production cycle. The VEVOR Ice Maker typically creates 32 cubes in eight to ten minutes, while the EUHOMY and Typhur units generate nugget ice in seven minutes. Allow the cycle to complete and then collect a sample of ice for visual inspection.
Clear, uniformly sized cubes or nuggets indicate successful seasoning. If the ice appears cloudy, repeat the cleaning cycle with a vinegar solution and ensure the water filter (if present) is installed correctly. For nugget ice, a slight softness is normal; however, overly mushy ice suggests insufficient freezing time, which can be corrected by increasing the thickness setting.
Document the settings used for future reference. Many users keep a small notebook beside the machine to record temperature, thickness, and any adjustments made during the first week of operation.
Tips & Pro Tips
- Use filtered water to reduce mineral buildup; this extends the time between deep‑clean cycles.
- Schedule a weekly 5‑minute self‑clean on the VEVOR or Typhur models to maintain crystal‑clear ice.
- Place the unit away from direct sunlight; excessive heat forces the compressor to work harder, increasing energy consumption.
- For commercial settings, consider installing a dedicated water line with a pressure regulator to ensure consistent flow.
- When moving the appliance, keep the stainless‑steel scoop attached to avoid misplacement.
Troubleshooting
| Problem | Possible Cause | Solution |
|---|---|---|
| No ice production | Water inlet not connected or low water pressure | Verify hose connection, open faucet fully, and check for kinks. |
| Cloudy ice | Mineral residue in the evaporator | Run a deep‑clean cycle with vinegar; consider a water filter. |
| Ice sticks to the scoop | Excess humidity inside the bin | Allow the bin to air‑dry for a few minutes between cycles. |
| Frequent fault alerts | Improper leveling | Adjust the four screw‑in feet until the unit is level. |
Conclusion
Seasoning a new countertop ice maker involves a systematic approach: unboxing, cleaning, priming, verifying insulation, and running a test cycle. By following the five steps outlined above, one can ensure reliable ice production, prolong the machine’s lifespan, and enjoy perfectly clear ice for drinks, seafood, or smoothies. Remember to incorporate the recommended maintenance schedule, and the appliance will serve faithfully for years.
Products Mentioned in This Guide
Frequently Asked Questions
Why must I season a brand‑new countertop ice maker before first use?
Seasoning removes manufacturing residues, calibrates sensors, and prevents cloudy or off‑tasting ice.
What cleaning solution should I use for the pre‑use cleaning step?
Use food‑grade white vinegar (5 % acidity) or a commercial ice‑maker cleaner.
How do I prime the water system after cleaning?
Fill the reservoir with fresh water, run a short cycle, then discard the water before the first ice batch.
What should I check on the control panel before the first cycle?
Verify that the temperature settings, ice size, and any optional modes are set according to the manufacturer’s recommendations.
How can I avoid cloudy ice and foul odors after seasoning?
Run at least two full test cycles, discarding the first batches, and ensure the unit is rinsed thoroughly after cleaning.